
Advanced authoring in Microsoft Word – Part 2: Using styles
Now, how does all this work in practice in Microsoft Word? Actually, it is very simple. You set the style of a paragraph using the Styles group on the Home tab in the ribbon in Microsoft Word 2007 and later.

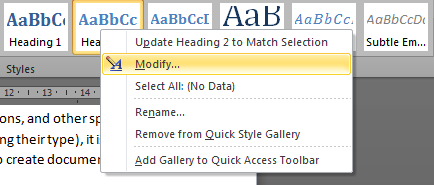
You can change the presentational attributes (such as font and paragraph settings) of a particular style by right-clicking the style (in the ribbon) and selecting ‘Modify…’.
In the dialog box that is shown, you can change the general settings of the style (such as the style of the following paragraph) and some simple font and paragraph settings. However, you often need to use the Format button in the bottom-left corner of the dialog box to get access to the full font and paragraph settings.
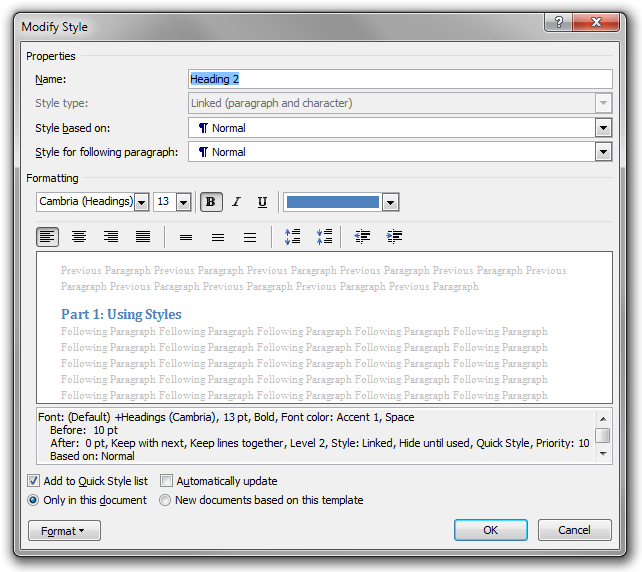
The ‘Style for following paragraph’ setting is very convenient. Here you enter the kind of paragraph that will normally be used immediately following paragraphs of the style you are currently revising. For example, if you have coloured example boxes in a mathematics textbook, you might have an ‘Example Heading’ style that is to be followed by paragraphs of type ‘Example Body’. Similarly, the built-in heading styles (‘Heading 1’, ‘Heading 2’, …) use ‘Normal’ as the style for the following paragraph.
The effect of this setting is that the specified style (‘Style for following paragraph’) will be used for the new paragraph that is created when you press Return at the end of a paragraph of the current style. Word does not, however, enforce that paragraphs of the current style will always be followed by paragraphs of the specified style.
You can (and often should) create new styles. In the user interface, there are several ways of doing this. One is to press Alt+Shift+Ctrl+S to open the Styles tool window. In the bottom-left corner, there is a button called ‘New Style’ that will create a new style.
Among the most frequently used styles are the various levels of headings: ‘Heading 1’, ‘Heading 2’, ‘Heading 3’, and so on. (These are built-in.) You may set the style of the current paragraph to one of these using keyboard shortcuts, namely, Alt+Shift+Left and Alt+Shift+Right. If the current paragraph has style Heading N, these commands will change the heading to Heading (N−1) and Heading (N+1), respectively. On the other hand, if the current paragraph is not a heading, the former shortcut will change the style to the same style as the previous heading in the document, and the latter will change the style to the same style as the previous heading plus one.
Hence, Alt+Shift+Left is used to create a new section at the same level as the current one (a sibling), while Alt+Shift+Right is used to create a new subsection (the first one) in the current section. (In both cases, the current paragraph becomes the heading of the new section or subsection.)
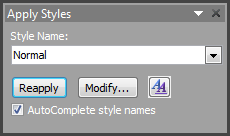
Another very useful keyboard shortcut is Shift+Ctrl+S which will open (if needed) and bring focus to the Apply Styles tool window (not to be confused with the previously mentioned Styles tool window). This window can be used to apply a style by typing the name of the style. This is very convenient. For example, when I want to create a new coloured example box in a mathematics textbook I am writing, I simply press Shift+Ctrl+S, E (as in ‘Example’ which will be automatically completed), and Enter.
Occasionally, the shortcut Shift+Ctrl+N is useful, too. It will change the style of the current paragraph to ‘Normal’.